Build
Design your virtual being's conversation logic in the Conversation Editor.
Inside the Conversation Editor
This is where your virtual being's conversation logic comes together, inside the Conversation Editor – the Dashboard's visual, node-based workspace. Everything here is organized into a Pipeline: a structured set of interconnected components that together handle every aspect of a conversation turn.
The Pipeline
The Pipeline is the top-level model for conversational logic in Virbe. It has four components, all visible in the left sidebar of the editor:
Handlers
Handlers are event-driven pre-processors that run before any conversational flow executes. Each Handler responds to a specific system event – a user message, a language change, a new conversation starting, a conversation ending, or a face being detected by the kiosk camera.
When an event fires, its Handler runs first, inspects and optionally modifies the context, then either passes control to the Conversational Flows or abandons processing entirely. Think of Handlers as the "input layer" of the pipeline.
Five Handlers are available:
- On User Input – Runs on every user message
- On Language Change – Runs when the user's language changes
- On conversation-start – Runs when a new session begins
- On conversation-stop – Runs when a session ends
- On face-detected – (Kiosk only) Runs when the camera detects a face
Conversational Flows
Conversational Flows are the main conversation logic – directed graphs of nodes that define what the virtual being says and does in response to user input. Flows are activated by Handlers and can call each other, branch conditionally, query data, call external APIs, and more.
You can have up to 100 flows per pipeline. Flows appear in the left sidebar and can be organized by purpose: a Core flow for routing, a Main flow for general conversation, an Agent flow for LLM-powered Q&A, a Greet flow for first contact, and so on.
Automations
Automations are background flows that run automatically at lifecycle events – not triggered by user input. The default automation, End Conversation, runs when a session ends and is typically used to generate a conversation summary or title, log data, or trigger a webhook.
Unlike Conversational Flows, Automations run silently in the background without generating visible responses to the user.
Variables & Signals
Variables are named, typed values that nodes can read and write. There are two kinds:
- User variables – persist across conversations for the same end user (e.g., email, GDPR consent)
- Conversation variables – last only for the current session (e.g., current topic, selected product)
Signals are named events that can be fired and listened to within the pipeline. Four predefined signals map to the conversation lifecycle (conversation-start, conversation-stop, conversation-language-change, face-detected). You can also define custom signals for specific use cases.
Editor Layout
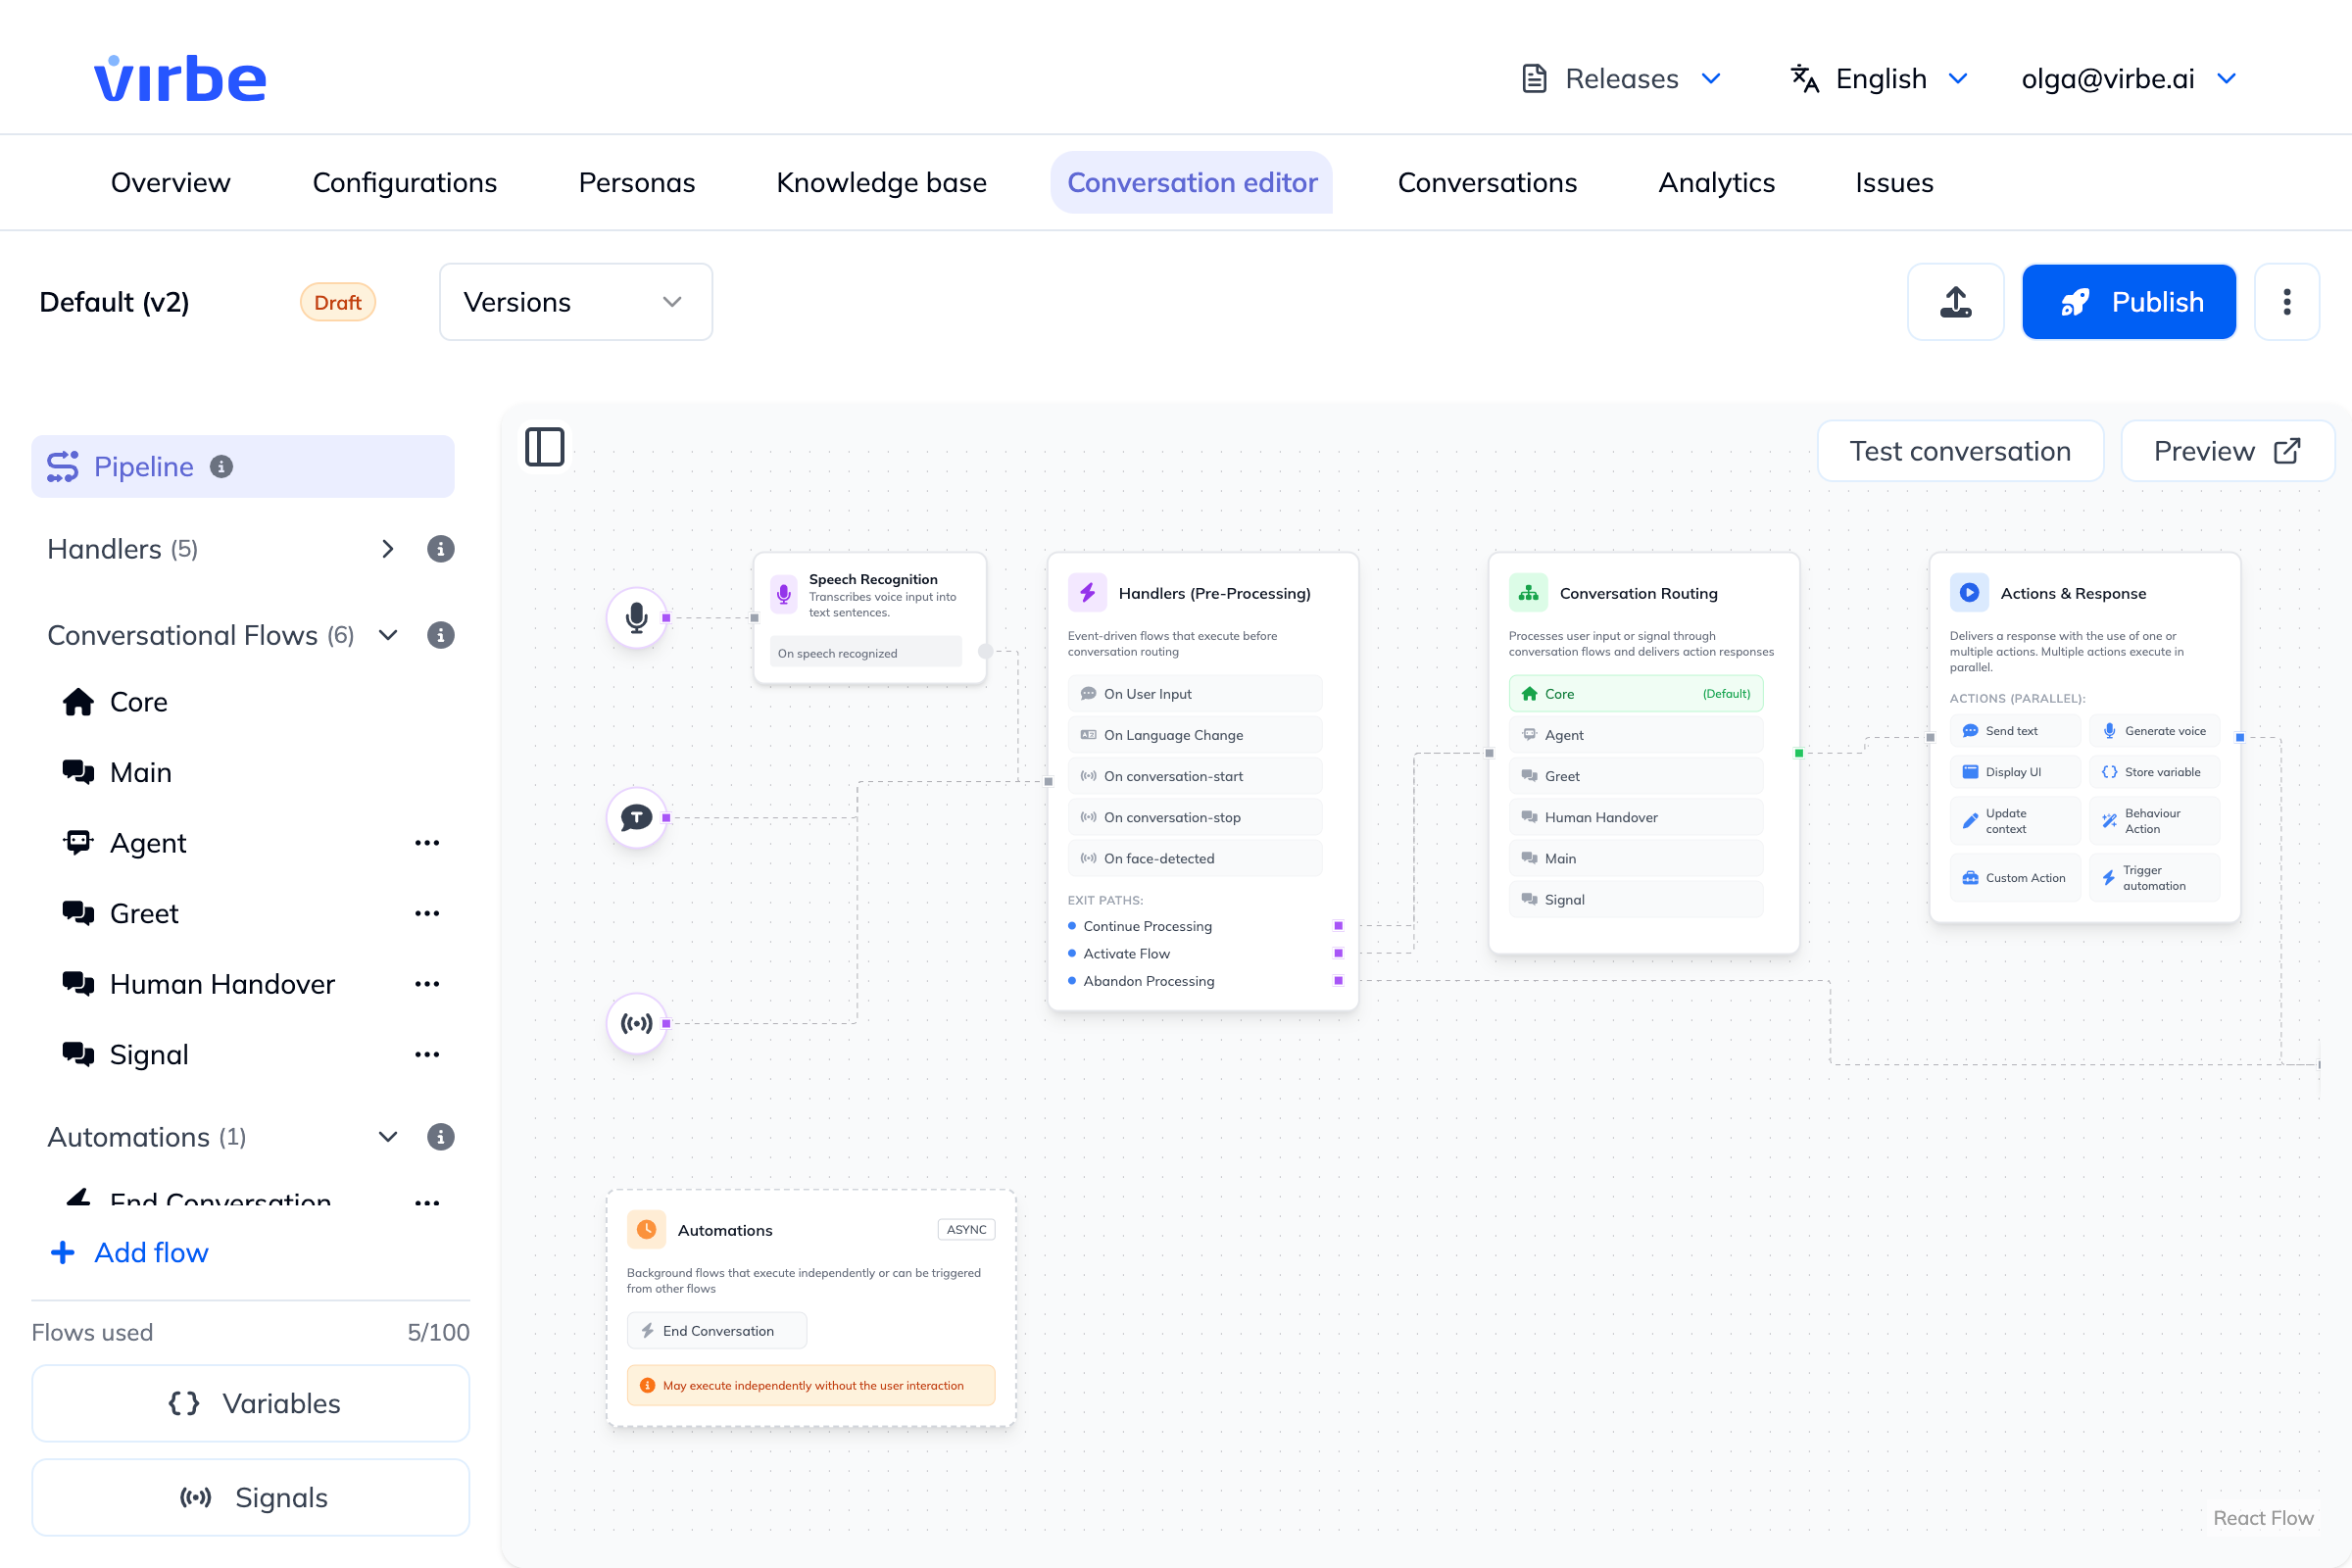
When you open the Conversation Editor, you'll see:
- Left sidebar – The Pipeline panel listing Handlers, Conversational Flows, Automations, and at the bottom, Variables and Signals
- Canvas – The visual node graph for the selected Handler or Flow
- Top bar – Version selector, Publish button, Test conversation, Preview, and the three-dot menu
Click any Handler or Flow in the sidebar to open it on the canvas. Click any node on the canvas to open its configuration panel on the right.
Getting Around
| Action | How |
|---|---|
| Open a Handler or Flow | Click its name in the left sidebar |
| Add a node | Click + Add node at the bottom left, or press N |
| Connect nodes | Drag from an output port (right side) to an input port (left side) |
| Configure a node | Click the node – a config panel slides in from the right |
| Delete a node | Select it and press Delete or Backspace |
| Pan the canvas | Hold Space + drag, or use middle mouse button |
| Zoom | Scroll wheel or pinch gesture |
| Test your pipeline | Click Test conversation in the top bar |
Top bar tools
The top bar of the Conversation Editor provides the main controls for testing, publishing, and managing versions.
Test conversation
Click Test conversation to open a live chat panel on the right side of the editor. The panel runs your current Draft pipeline – no publishing required.
Options in the test panel:
- Show system messages – toggle to reveal internal pipeline events (flow transitions, handler firings) alongside the user-visible messages. Useful for debugging routing logic.
- Flow Change events – when visible, the transcript shows entries like
Flow Change – from Core to Greetwhenever the pipeline transitions between flows. - Trigger Signal button – manually fire any signal defined in the pipeline to test signal-driven logic without needing to type specific inputs.
Click End test to close the panel. Test conversations are not stored in Monitor → Conversations.
Issues
The Issues badge in the top bar shows a count of validation problems in the current Draft. Click the badge to expand a dropdown listing each issue with its context – for example: AI model not selected – LLM Response in "Greet".
Fix the listed issues before publishing. The Issues count updates in real time as you edit the pipeline. A zero count does not guarantee the pipeline will behave as expected, but it does confirm all required fields are filled.
Import / Export
The three-dot menu (⋮) in the top right of the editor provides:
- Import – replace the current Draft with a pipeline exported from another Dashboard or a backup file. Use this to clone conversation logic across Dashboards or restore a saved version.
- Export – download the current Draft as a portable pipeline file. Useful for backup, sharing with another team, or importing into a different Dashboard.
Importing a pipeline replaces the entire current Draft – all flows, handlers, automations, variables, and signals. This cannot be undone. Export your current Draft first if you want to keep it.
Assign draft to profile
Also in the three-dot menu: Assign draft to profile. This routes the current unpublished Draft to a specific profile so it becomes that profile's active version without affecting any other profiles. Availability of this feature depends on the licence.
Use this for pre-production testing – assign the Draft to a staging profile, verify the experience end-to-end, then publish when ready. The production profile continues running the previously published version throughout.
Versions
The Versions dropdown shows all versions of this Pipeline with their current state:
- Draft – the version currently being edited
- Published – the live version serving real users (read-only in the editor)
- Retired – a previously active version (can be viewed and restored)
Each entry shows the version name and date. Clicking a version switches the editor to view that version. Published and Retired versions are read-only – a blue banner confirms: "Viewing published version. This version is read-only. Create a new draft to make new changes."
Create new version
Click + New version at the bottom of the Versions dropdown to open the Create new version modal. Two tabs:
Templates – Start from a pre-built pipeline structure. Available templates include:
- Default – Virbe's recommended starting pipeline with Core, Main, Agent, Greet, Human Handover, and Signal flows pre-wired
- Blank – an empty pipeline with no flows
From Version – Duplicate an existing version. Select any version from the dropdown and click Duplicate – a new Draft is created with all flows, signals, and variables copied from the selected version.
Preview
Preview (top right) opens the web widget in a new browser tab, running your current Draft. This is the actual widget UI – not a simplified simulation. Use it to test the full user experience including avatar, voice, and widget appearance before publishing.