Badge Registration with QR Codes
Build a flow where attendees scan QR code badges at a kiosk to register, receive a personalized greeting, and access event information.
Attendees receive QR code badges via email before the event. At the kiosk, they scan their badge, the system matches it against an attendee Data Table, and the avatar greets them by name and completes their registration.
User Journey Overview
Attendee approaches kiosk
       |
       v
[Scans QR badge] ── kiosk reads badge code via QR scanner
       |
       v
[Find Record(s)] ── look up attendee in Data Table by badge code
       |
       v
[If-Else Router] ── found or not found?
       |                    |
    found              not found
       |                    |
       v                    v
[LLM Response]      [LLM Response]
"Welcome, Jane!      "Sorry, I couldn't
Your registration     find your badge.
is confirmed."        Please check in
       |               at the desk."
       v
[Quick Reply] ── "View schedule" / "Venue map" / "Ask a question"
Step 1: Prepare the Attendee Data Table
Create a Data Table to store attendee information. Navigate to Data Tables in the dashboard and create a table with the following columns:
Columns:
- Badge Code (String) – unique code encoded in the QR badge
- Name (String) – attendee's full name
- Email (String) – contact email
- Company (String) – attendee's organization
- Ticket Type (String) – e.g., "General", "VIP", "Speaker"
- Registered (Boolean) – check-in status, initially false
- Sessions (JSON) – list of registered sessions
Import your attendee data manually or via the API. Each attendee's badge code must be unique and match the value encoded in their QR code.
Step 2: Set Up the QR Scanner Signal
Configure the QR code scanner to send scan events into the conversation:
- Connect the QR scanner to the kiosk via serial port (preferred) or USB
- Define the signal name in Dashboard → Profiles → Settings → Metahuman Kiosk Profile Settings:
-
Set a custom signal name for scan events, e.g.,
badge-scan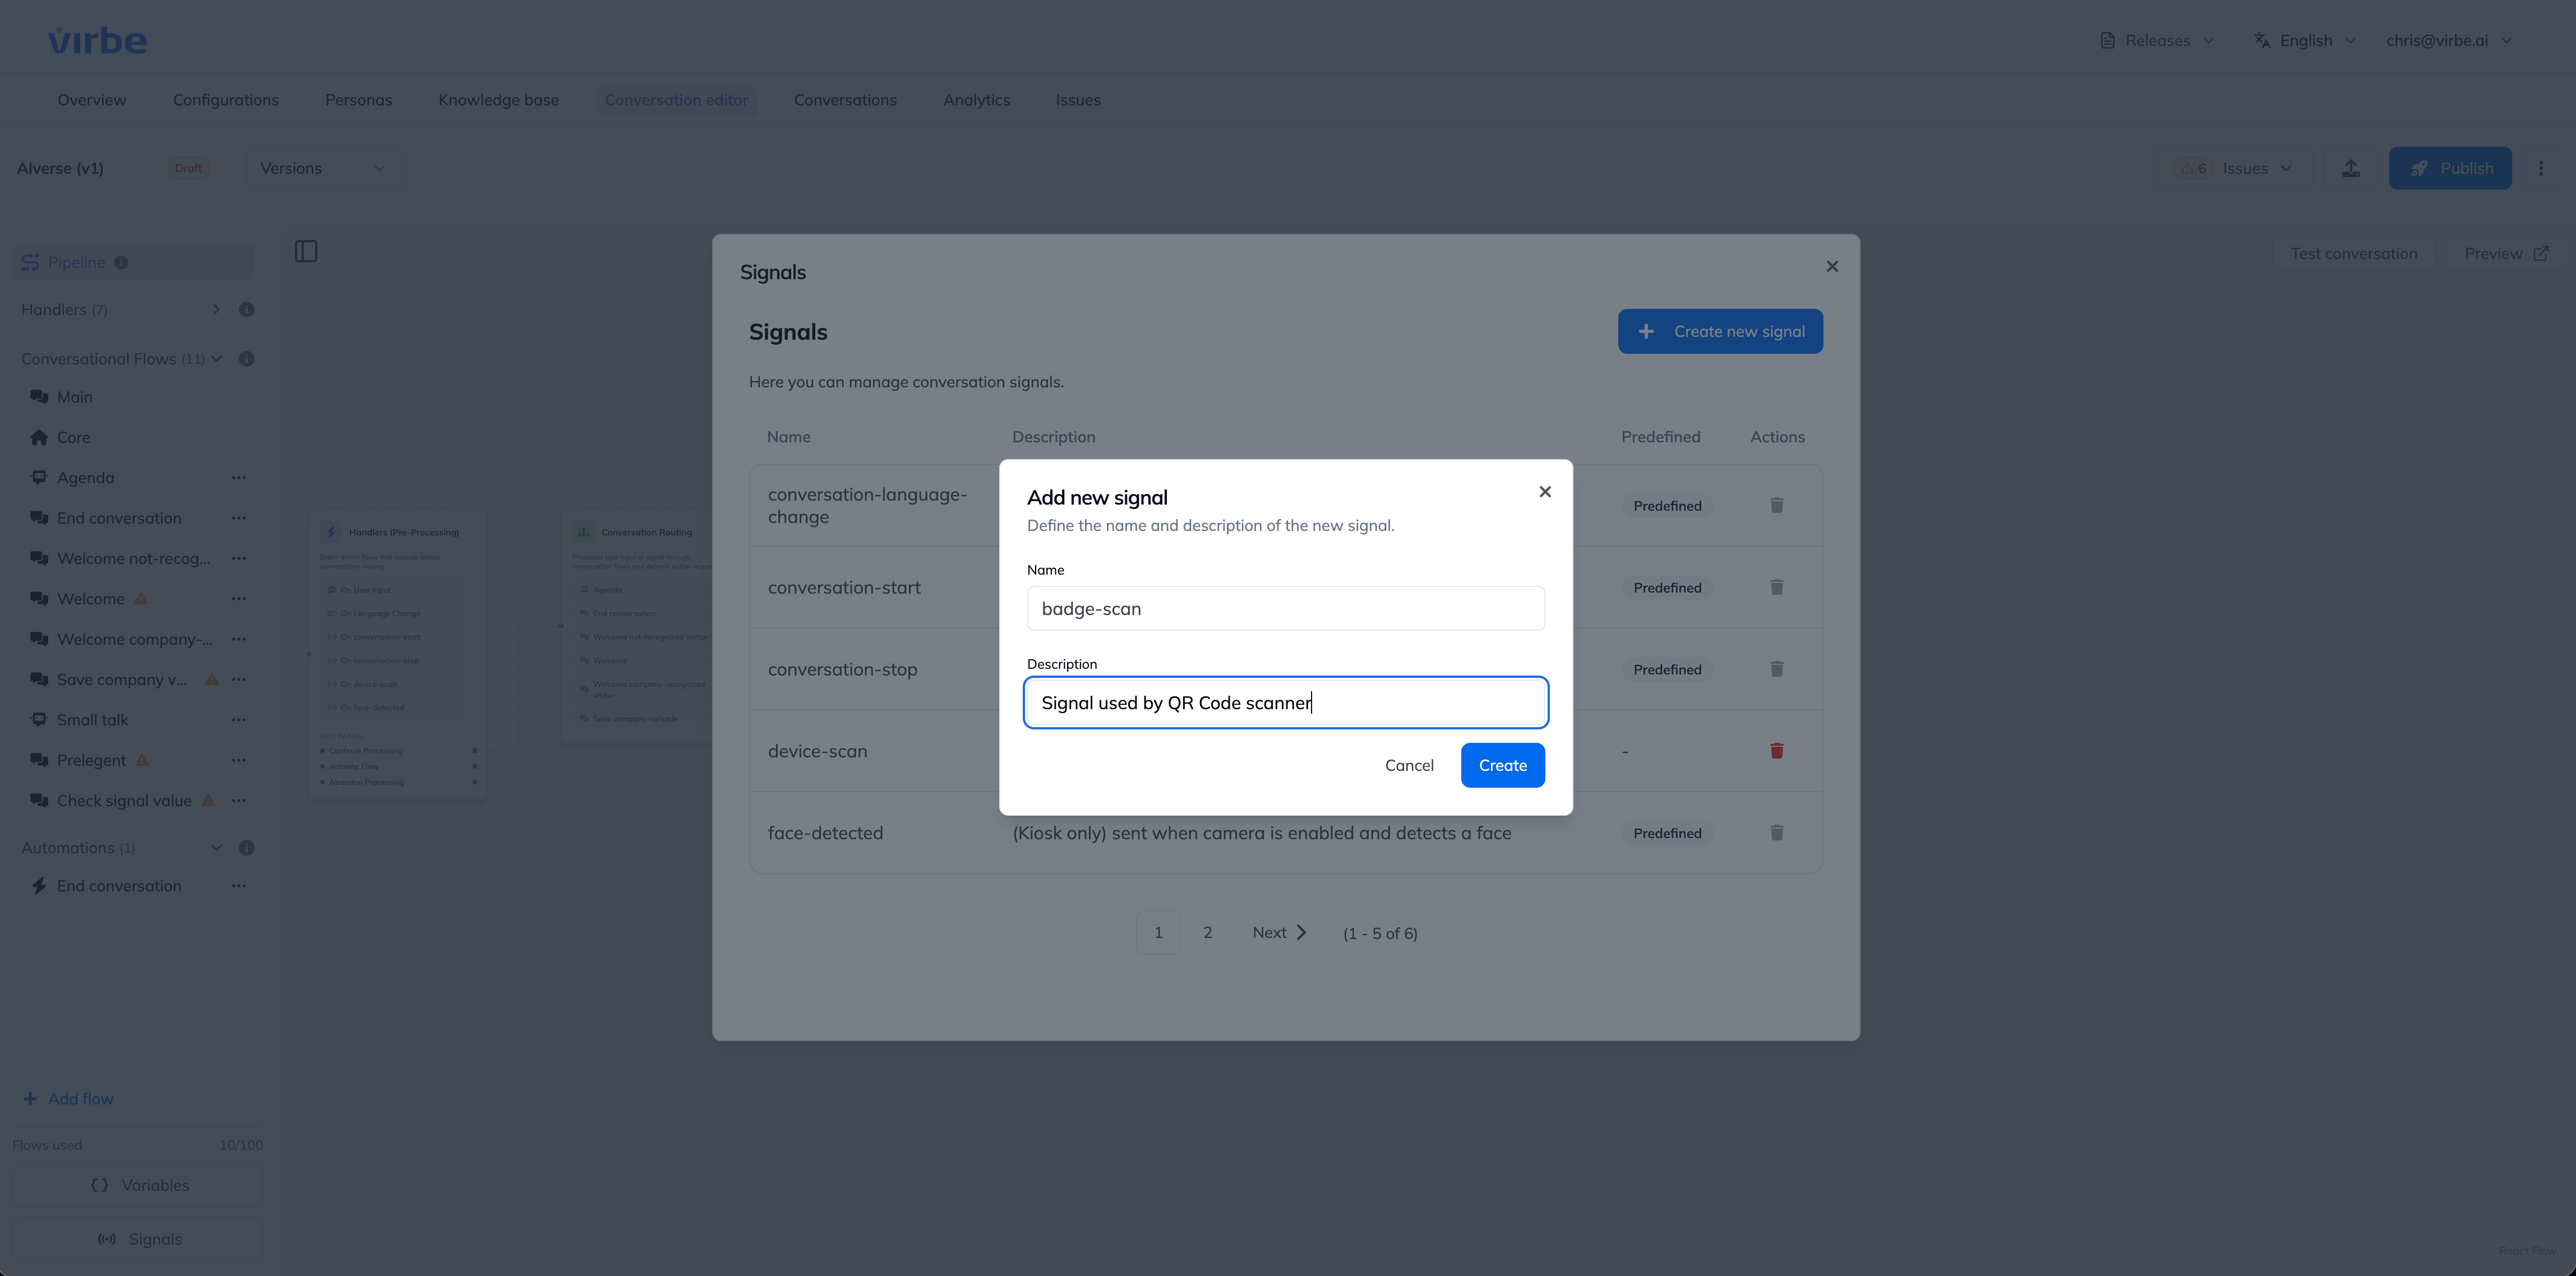
-
- Configure the Conversation Flow Start node to listen for the
badge-scansignal-
The scanned QR code value is passed with the signal and available as a conversation variable\
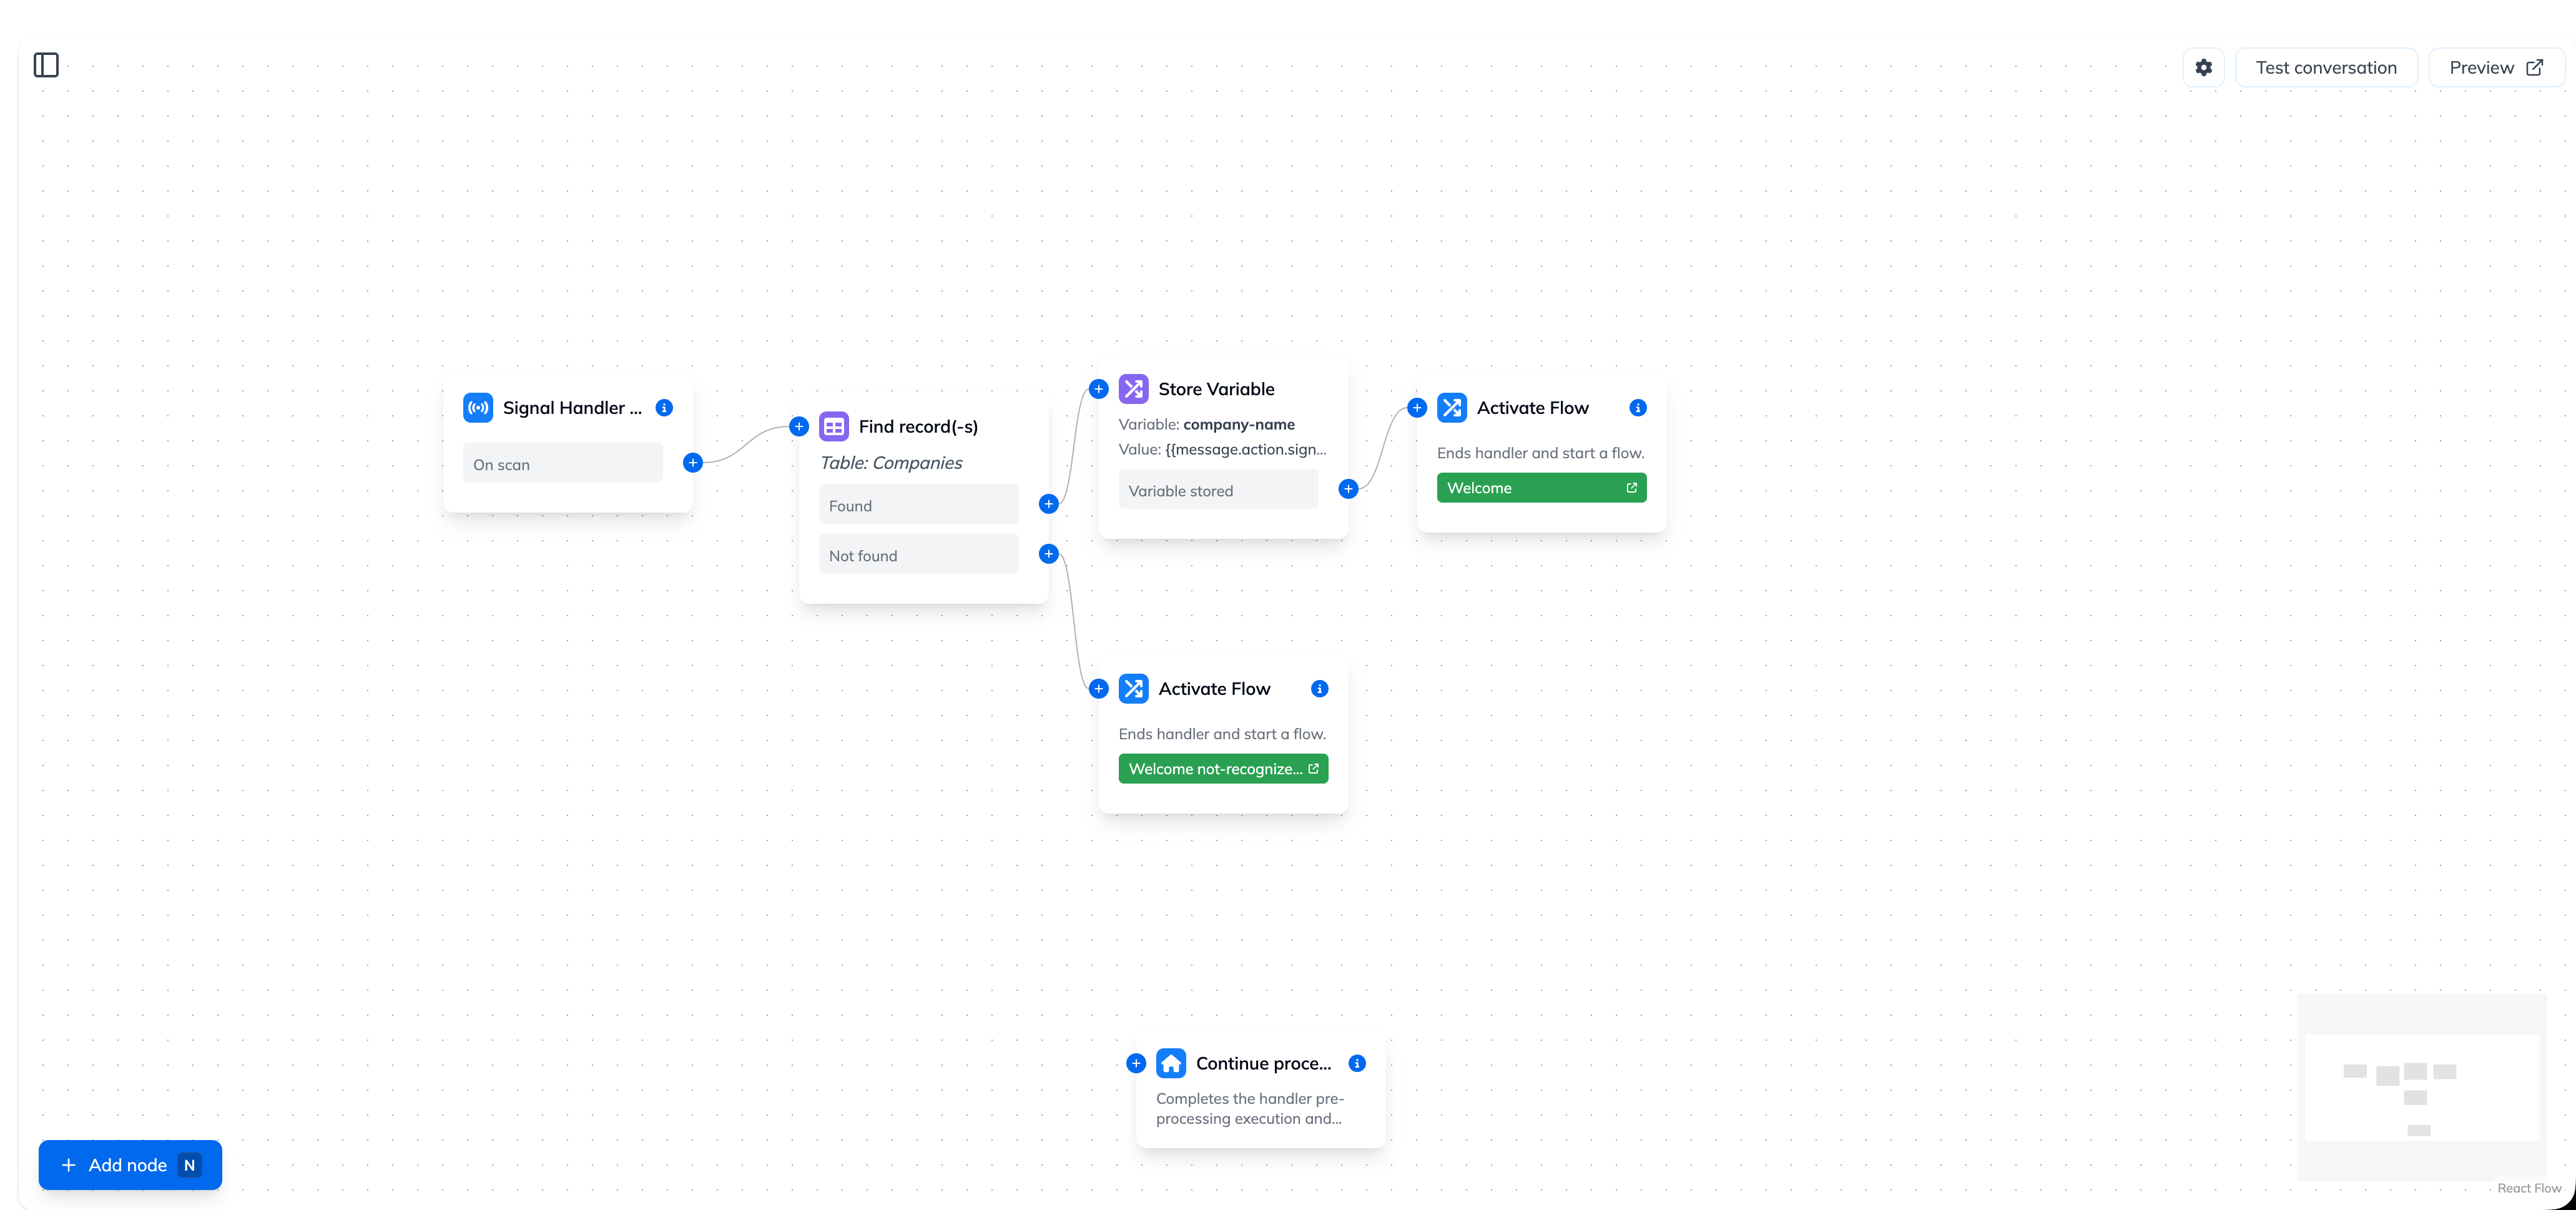
-
The signal name configured in Kiosk Profile Settings must exactly match the signal name used in your Conversation Flow's Start node.
Step 3: Look Up the Attendee
Add a Find Record(s) node after the scan signal trigger:
- Table: Attendee Data Table
- Results: Single record
- Filter by: Badge Code column
- Condition: Equals
- Match by: Signal Value –
{{message.action.signal.value}} - Store result as:
variable.attendee
Then add an If-Else Router node to handle both cases:
- Condition: Check if
conv.attendeeexists / is not empty - If true: Proceed to greeting (Step 4)
- If false: Route to a friendly error message – "I couldn't find a registration with this badge. Please visit the help desk for assistance."
Step 4: Greet and Register
Add an LLM Response node for the "found" branch:
- System instruction:
You are a friendly event host avatar at a conference kiosk. An attendee just scanned
their badge. Greet them warmly by their name, confirm their registration, and mention
their ticket type. If they are a VIP or Speaker, add an extra welcome message.
Keep it concise and enthusiastic – 2-3 sentences maximum.- Additional context: Inject the
conv.attendeevariable so the LLM has access to the attendee's name, company, ticket type, and sessions.
Step 5: Post-Registration Options
After the greeting, offer the attendee useful actions with a Quick Reply node:
"How can I help you?"
Options:
- View my schedule
- Show venue map
- I have a question

Save reply as: conv.post_registration_choice
Handle each branch:
- View my schedule – Use Cards from Table to display session cards from the attendee's
SessionsJSON field, or use an LLM Response to summarize their schedule - Show venue map – Use a Custom Action to display a venue map image or web view on the kiosk
- I have a question – Route to a general LLM Response node backed by a Knowledge Base with event FAQs
Flow Template
Download the pre-built Badge Registration flow template and import it into your Conversation Flow Editor to get started quickly.
Download Flow Template (JSON)
How to import a flow template:
- Download the
.jsonfile above - In the Virbe Dashboard, navigate to Conversation Flows
- Click Import Flow (or create a new flow and use the import option)
- Select the downloaded
.jsonfile - Review the imported nodes and update any placeholder values (e.g., Data Table references, signal names)
- Connect the flow to your profile and test
Note: The flow template will be available once the reference flow is built and exported from the Conversation Flow Editor.
Generate a Test QR Code
Use this tool to generate QR codes for testing your badge registration flow. Enter an attendee badge code (matching a record in your Data Table) and generate a scannable QR code.
Enter a badge code or any text value to generate a scannable QR code for testing.
Print the generated QR code or display it on a phone screen to test scanning with your kiosk's QR code reader.
Conference & Event
Build an AI avatar kiosk that registers conference attendees by scanning QR code badges and matching them against attendee records.
Retail - In-Store Kiosk
Build an AI shopping assistant kiosk that searches products, displays recommendations, and handles RFID / barcode / QR code product scanning.